The Best Knots for Tying Fishing Hooks to Your Line
Which knots to use for tying fishing hooks to your line depends on the angle of the hook eye and the type (and diameter) of line you want to attach it to.
For example, does the hook have a turned-up eye, a turned-down eye or a straight eye?
And is the line you're tying it to monofilament, fluorocarbon, braid or wire? Actually, we can forget braid as it's not suitable for hook links; mono or fluorocarbon is the stuff for these.
Or are you attaching your hook to a single-strand, or multi-strand wire leader? You can forget knots for these; none are suitable. It'll be a haywire twist for the former and a crimped connection for plastic-coated or bare cable wire leader.
So let's start with ...
1. Tying Fishing Hooks with Turned-up or Turned-Down Eyes
These types of hooks are only suited for tying with monofilament or fluorocarbon line, as the line must be first passed through the eye then tied around the shank. And for both line types the knot to use is the snell or snood knot...
a. The Snell Knot (or Snood Knot) for Mono and Fluorocarbon Lines
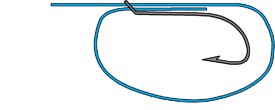 Stage 1 Stage 1 |
First, pass the line through the hook's eye twice, as shown here. Note the loop hanging under the hook. |
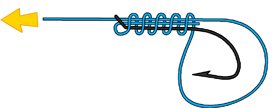 Stage 2 Stage 2 |
Then, take the loop and wind it around the hook's shank and both lines. Make 5 or so turns for heavy lines, perhaps 10 for the lightest. To tighten the knot, grip the turns between thumb and forefinger and pull the line in the direction of the arrow. |
The hook shown here has a turned-up eye, but had it been turned-down the process would have been exactly the same.
2. Tying Fishing Hooks with Straight Eyes
Straight-eyed hooks can be attached to any type of line, but each type requires its own method. For example ...
a. The Uni-Knot, for Mono and Fluorocarbon Lines
 Stage 1 Stage 1 |
First, pass a line through the eye of the hook and form a loop as shown here. |
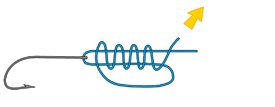 Stage 2 Stage 2 |
Now make at least four turns (more for light lines) around both strands and through the loop. Wet the knot with saliva and start tightening it by first pulling on the tag end in the direction of the arrow. |
 Stage 3 Stage 3 |
Then, with the knot now well consolidated, snip off the end close and pull on the line to slide it down towards the hook. |
 Stage 4 Stage 4 |
And that's it, the finished knot, as it's tied for attaching the line to swivels, hooks and lures. |
b. The Haywire Twist, for Single-Strand Wire Lines
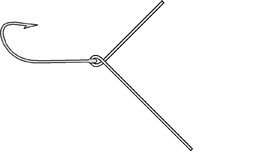 Stage 1 Stage 1 |
First, pass about 4 inches (100mm) of wire through the eye of the hook and carefully fold back so that it crosses the standing part. |
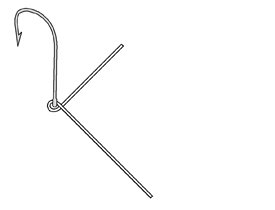 Stage 2 Stage 2 |
Next, start twisting the wire evenly so each strand turns around the other. The hook can be swiveled 90 degrees to give some leverage. |
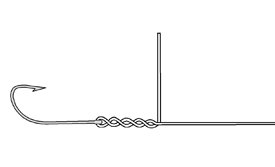 Stage 3 Stage 3 |
Then, after half a dozen twists, bend the tag end upwards so it's perpendicular to the standing part and .... |
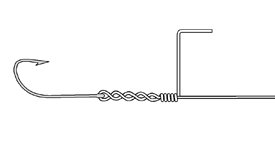 Stage 4 Stage 4 |
Finally, add half a dozen turns of 'barrel wraps'. Don't snip off the tag end with pliers or it will leave a sharp spur. Instead, bend the end to form a small crank handle, and then twist it back and forth until it snaps, and you've done it Artwork by Andrew Simpson |
For all other types of wire, plastic-coated multi-strand wire, and uncoated wire cable - forming a crimped connection is your only option.
Similarly, if your mono is too thick (80lb+) for knots, then crimping is the way to go.
Recent Articles
-
Sea Fishing Rods and Reels Must Be Compatible for a Balanced Outfit
Mar 08, 21 08:30 AM
A quality reel fitted to a quality rod doesn't necessarily make it a quality outfit. Your fishing rods and reels have to be properly matched if you're to get the best out of them, and here’s how -
Essential Lure Fishing Tips That All Saltwater Anglers Should Know
Mar 08, 21 04:51 AM
Which single lure fishing tip applies to trolling, jigging, baitcasting, spinning, fly fishing and any other branch of lure fishing? Well, it is the one at the top of this list -
Vital Jig Fishing Tips That You Really Cannot Afford To Miss!
Mar 07, 21 10:20 AM
Essential jig fishing tips to help you select the right lure for successful jig fishing, together with the techniques required to get the most out of your jig fishing outfit

New! Comments
Have your say about what you've just read! Leave me a comment in the box below.